Wingback Chair
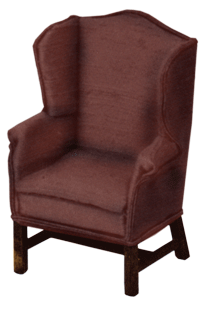
A comfortable reading chair, the wingback will be appreciated in any room.
We suggest you print out a copy to work from. See link below.
SIZE: 3”W x 2 1/8” D x 4”H
What you'll need:
Wood: 3/32” balsa sheet, 3/16” balsa sheet, 3/16” sq. balsa strip, 1/8” sq. balsa strip.
Basic tools and supplies, plus 3/16”-thick cotton padding, 1/8 yard fabric, soutache braid, dye or felt tip pen, cardboard.
Suggested Finish: mahogany
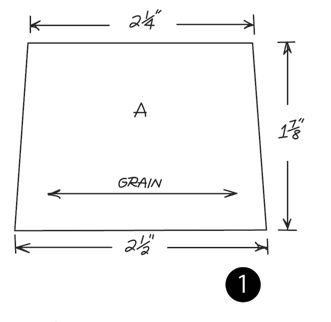
Piece A - Diagram 1
- Cut 1 piece from 3/32” Balsa wood.
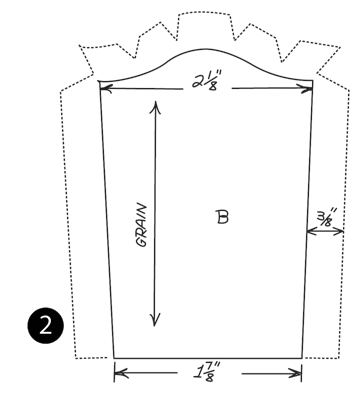
Piece B - Diagram 2
- Cut 1 piece from 3/32” Balsa wood. (solid line)
Cut 1 piece cotton padding (solid line)
Cut 1 piece fabric (dotted outline) on crosswise grain
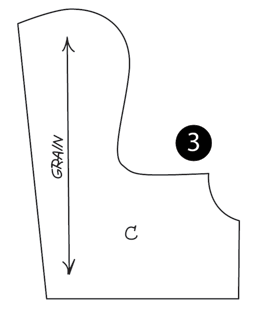
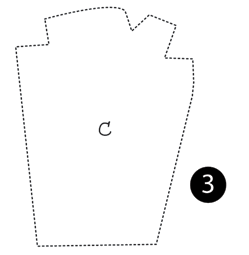
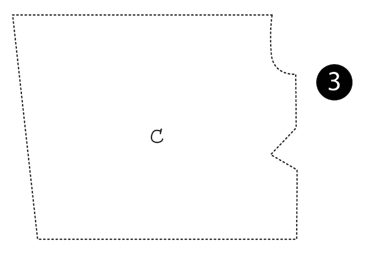
Piece C - Diagram 3
- Cut 2 pieces from 3/32” Balsa Sheet.
- Cut 2 pieces from cotton padding. (solid outline)
- Cut 1 piece fabric from diagram 3a.
- Cut 1 piece fabric from diagram 3a reversed.
- Cut 1 piece fabric from diagram 3b.
- Cut 1 piece fabric from diagram 3b reversed.
Cut fabric crosswise. Because chair wings (C) face each other, be sure to reverse top and bottom patterns on the same side of the fabric when cutting.
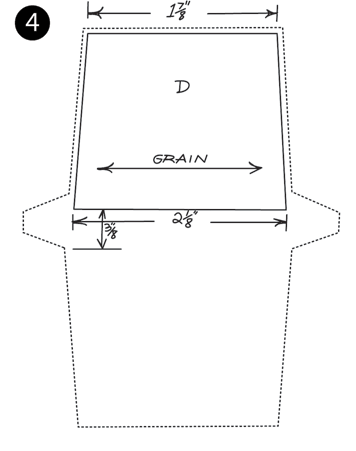
Piece D - Diagram 4
- Cut 2 pieces from 3/16” thick balsa sheet.
- Cut 2 pieces of cotton padding (Solid outline)
- Cut 1 piece fabric on crosswise grain. (dotted outline)
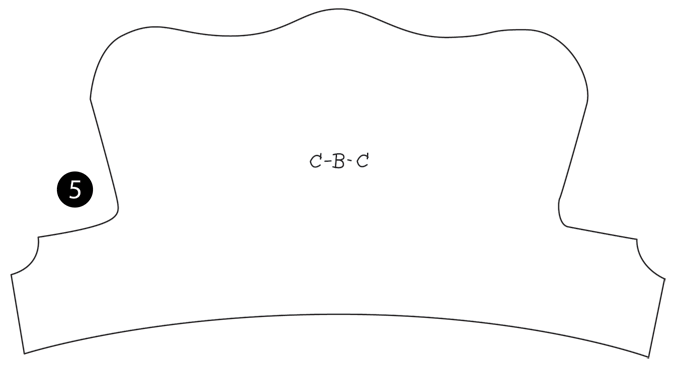
Piece CBC: - Diagram 5
- Cut 1 from fabric
Cushion Fabric:
- Cut a 2 1/2” x 3” piece of fabric on the crosswise grain.
Piece E:
- Cut a 2 1/2” x 3” piece of fabric on the crosswise grain.
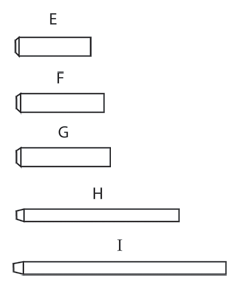
Piece F:
- Cut two 7/8” pieces from 3/16” square balsa strip.
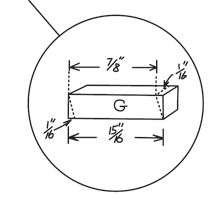
Piece G:
- Cut two 15/16” pieces from 3/16” square balsa strip.
Piece H:
- Cut two 1 5/8” pieces from 1/8” square balsa strip.
Piece I:
- Cut one 2 1/8” piece from 1/8” square balsa strip.
For stretchers (H) and (I), you may want to cut one 6” strip and later cut the three pieces exactly to size.
Printable Version
Directions:
Cutting Wood:
- Cut wood on lengthwise grain.
- Instead of using two 3/16” pieces for chair seat (D), you may use any combination of thickness of wood you have on hand and cut the pieces you need to obtain the required 3/8” thickness.
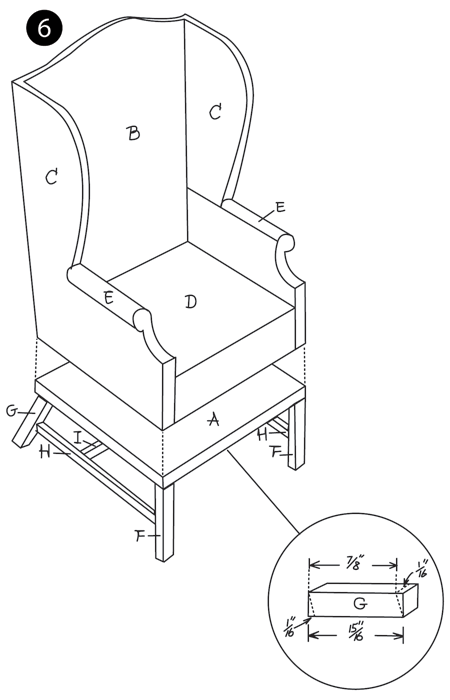
- Cut away top and bottom edges of back legs (G) on an angle of about 20 degrees; see detail in diagram 6. Make sure the slanted top and bottom edges are exactly parallel.
Sanding and Staining:
- Do not sand or stain wood pieces (B), (C), (D), and (E) because they will just be covered with fabric.
- Sand rest of wood, then stain.
Assembling Chair Base:
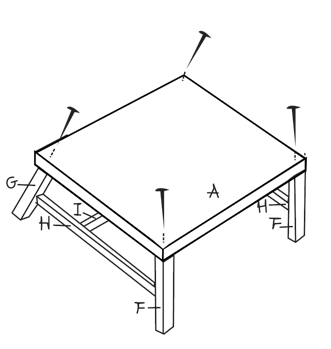
- Glue front legs (F) to bottom of chair base (A) at each corner along front edge. Reinforce legs with straight pins from top surface of (A); Repeat procedure for back legs (G), gluing them along back edge of (A).
- If you haven’t already cut stretchers (H), measure exact distance between front and back legs (F and G) and cut stretchers to fit. Slant one end of each stretcher to fit properly against back legs. Glue stretchers in place about midway between floor and base (A).
- Measure exact distance between stretchers (H) and cut stretcher (I) to fit between them; center and glue (I) between stretchers (H).
Assembling Upholstered Part of Chair:
- Glue together chair seat pieces (D) to form one piece. After drying, put glue on top and bottom surfaces of (D) but not on the 2 1/8” front edge. Glue fabric (D) to chair seat (D), tucking 3/8” fabric extensions to each side edge.
- Place chair back (B) on work surface and secure cotton padding (B) to it with a few dots of glue. Place fabric (B) right side facing up on top of padding, with bottom edge of fabric flush with bottom edges of padding and chair back; hold these edges in place with glue or pins. Turn over assembly and glue 3/8” fabric seams to back side of chair back, gluing straight side seams first and then curved, clipped top seam; trim seams if necessary to avoid extra thickness. Hold fabric in place with pins until glue is dry.
- Center and glue fabric side of chair back (B) to back edge of chair seat (D) so bottom edge of (B) is flush with bottom surface of (D). Reinforce gluing with straight pins.
- Glue armrest (E) to short straight top edge of chair wing (C) on outside surface of (C); the top edges of armrest and short straight edge of chair wing are flush. Repeat procedure for other chair wing and armrest.
- Place one chair wing (C) on work surface with armrest (E) facing down and cover with cotton padding (C); Stretch padding over armrest and hold in place with dot of glue. Place bottom half wing fabric (C) right side up on top or bottom half of padding, with bottom edges flush, hold these edges in place with glue or pins. Turn assembly over to armrest side. Glue fabric seams to this side, gluing straight seams first and then short, curved, clipped seam; trim seams if necessary to avoid extra thickness. Gluing fabric over armrest can be done smoothly if you tuck fabric over front edge of armrest first holding it in place with glue or pins and then draw fabric over top edge of armrest and glue seam to surface of wing (C) along bottom edge of armrest. Hold seam in place with glue and pins until dry.
- Turn over assembly from step 5 to fabric side. Fold under bottom edge seam of top half wing fabric (C) and cover top edge raw seam of bottom half wing fabric (C). Hold folded seam in place with a pin, if necessary, and turn entire assembly over again. Glue fabric seams to this side, gluing straight side seam first and then curved, clipped top and wing seams; trim seams if necessary to avoid extra thickness and hold in place with pins until glue is dried. Repeat steps 5 and 6 for other chair wing (C), padding (C), and top and bottom half wing fabric (C).
- Glue fabric side of chair wings (C) to sides of chair seat (D) so bottom edges of (C) are flush with bottom surface of (D). Reinforce gluing with straight pins. Glue long straight back edges of (C) to side edges of chair back (B).
- Fit right side of fabric (C—B—C) to outside surface of chair wings (C) and back (B). Place dots of glue as close to fabric edge as possible, an inch or so apart, and glue fabric along top, bottom, and side edges of chair back and wings to cover wood and raw seams.
- Glue upholstered chair assembly to chair base assembly so four side edges from each are flush and matching in length.
Finishing
- Shellac chair base assembly and varnish, but do not shellac or varnish side edges of base (A).
- Dye soutache braid to match fabric. Glue braid to raw seam edges of fabric (C—B—C), following contour of edges. Glue braid around base (A) to cover raw edges of fabric and side edges of (A).
- Use solid outline pattern in diagram 4 to make cardboard base for chair cushion. Place cushion fabric right side down on work surface; place padding on top of fabric, and cardboard base on top of padding. Glue fabric side seams to cardboard base first, then glue front and back seams to base. Glue cushion to chair seat (D).
3a
3b
Shrunk Your source of all things miniature
