Rocking Chair
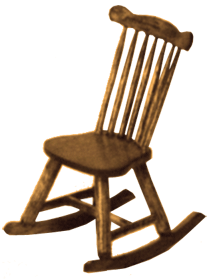
Little people need to rock too! This chair will keep them moving and grooving!
I suggest you print out this pattern.
Variation:
Size: 1 5/8” W x 2 ¼” D x 3” H
What you'll need:
Wood: 1/8” balsa sheet, 1/16” x ¼” balsa strip, 3/16” dowel, 1/8” round wooden toothpicks.
Basic tools and supplies, plus drinking glass or tin can about 3” in diameter, wide elastic band or masking tape.
Suggested Finish: Cherry
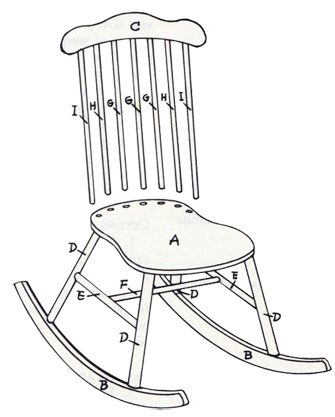
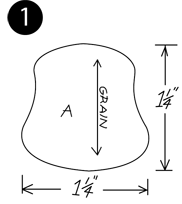
Piece A
- Cut 1 piece from 1/8” Balsa wood.
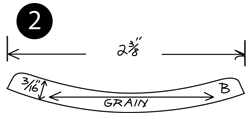
Piece B
- Cut 2 pieces from 1/8” Balsa wood.
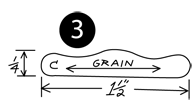
Piece C
- Cut 1 piece from 1/16” x 1/4” Balsa Sheet.
Piece D
- Cut four 1 1/8” pieces from 3/16” thick dowel.
Piece E
- Cut two 1” pieces from 1/8” thick dowel.
Piece F
- Cut one 1 1/8” Piece from 1/8” thick dowel.
Piece G
- Cut three 1 7/16” pieces from toothpicks.
Piece H
- Cut two 1 1/2” pieces from toothpicks.
Piece I
- Cut two 1 9/16” pieces from toothpicks.
Printable Version
Directions:
Cutting Wood:
- Cut wood on lengthwise grain. The grain of piece (A) runs from front to rear.
- Cut away tops of chair legs (D) on an angle of about 20 degrees, making sure the amount of away is the same on all four legs.
Sanding and Staining:
- Sand wood.
- Soak chair back rail (C) in warm water for 5 minutes, then bend carefully around drinking glass or tin can with grain running horizontally and secure in place with elastic band or masking tape. Dry at room temperature or in low oven for ten minutes.
- Round bottom of legs (D).
- Stain wood.
Assemblly
- Place glue on pointed end of one chair slat (G) and insert 1/16” into molded straight bottom edge of back rail (C) at center. Repeat procedure for other two slats (G), spacing each 1/8” from center slat. Repeat procedure for two slats (H), spacing 1/8” from slats (G). Repeat procedure for two slats (I), spacing 1/8” from slats (H). Make sure all slats dry firmly.
- Make a pencil mark 1/16” in from back edge of chair seat (A) at the center. Make six more pencil marks, 1/8” apart, three to the left of center mark and three to the right, following countour of back edge of (A). Glue slats from step 1 to pencil marks; the slats are graduated so they will slope automatically at the correct angle. Hold chair back assembly in place with hands until glue begins to set.
- Glue chair legs (D) to underside of corners of seat (A) with each leg facing outward. Make sure legs are lined up evenly from front to back and from side to side.
- Glue chair rungs (E) between front and back chair legs slightly up from bottom. A little sanding will be necessary for an accurate fit. Glue stretcher (F)between chair rungs (E) at the center.
- Glue rockers (B) to front and back legs (D) so each rocker extends ¼” from front leg and 5/8” from back leg.
Finishing
- Shellac chair legs, rings, and stretcher only once. Smooth with steel wool very carefully.
- Varnish.
Variation:
Windsor Chair.
For a Windsor chair with no rockers, cut front legs (D) 1 ¼” long.


Shrunk Your source of all things miniature


