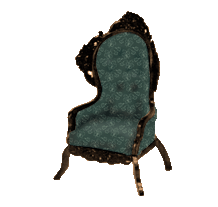
Parlor Chair
This darling little chair is elegant and comfortable. Perfect for any high class doll house room.
Size: 2 1/8” W x 1 7/8” D x 4 ¼” H
What you'll need:
Basic tools and supplies, plus small frozen orange juice can, wide elastic bands or masking tape, embossed paper picture frame, woodtone paint, oaktag cardboard, 3/16”-thick cotton padding, 1/8 yard fabric, soutache braid, dye or felt tip pen, embroidery floss.
Suggested Finish: Walnut
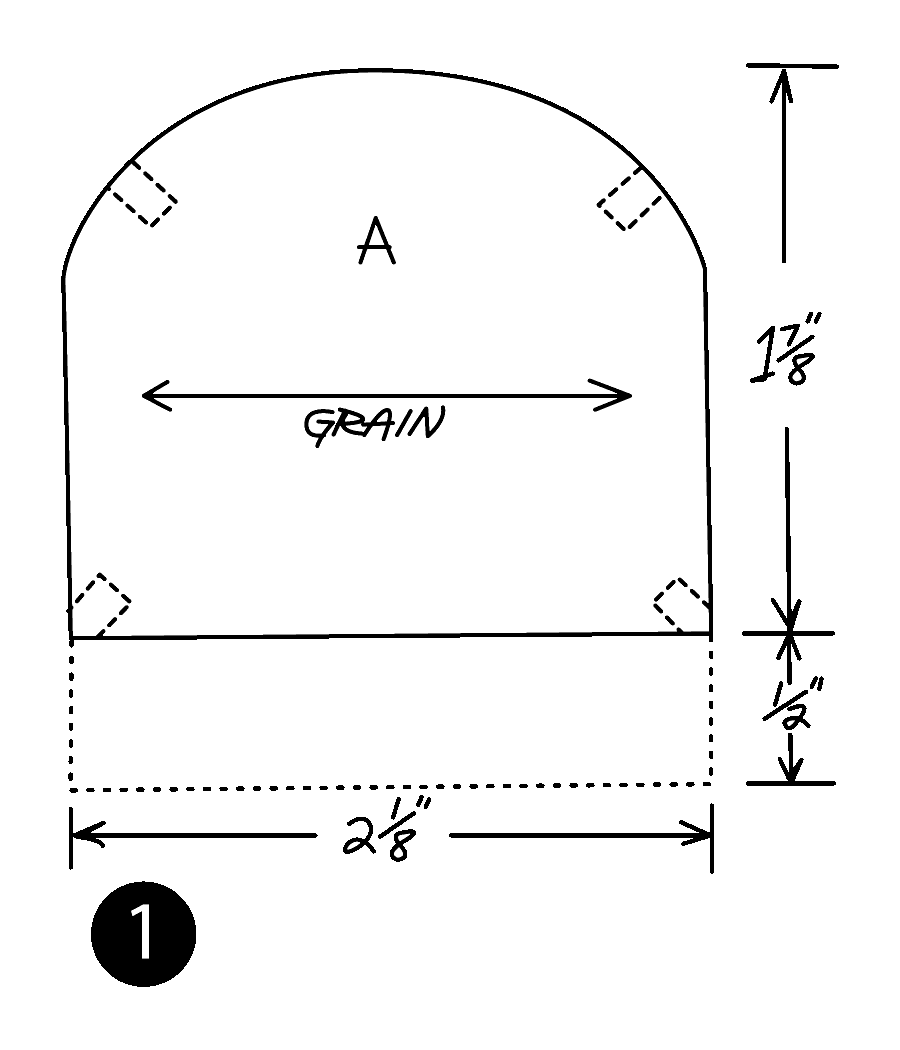
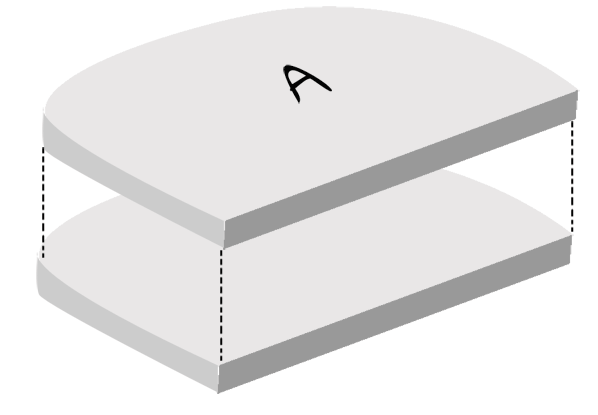
Piece A - Diagram 1
- Cut 1 piece 3/16” Balsa wood (Solid Outline Only)
- Cut 2 pieces from fabric (Solid curved outline plus dotted outline)
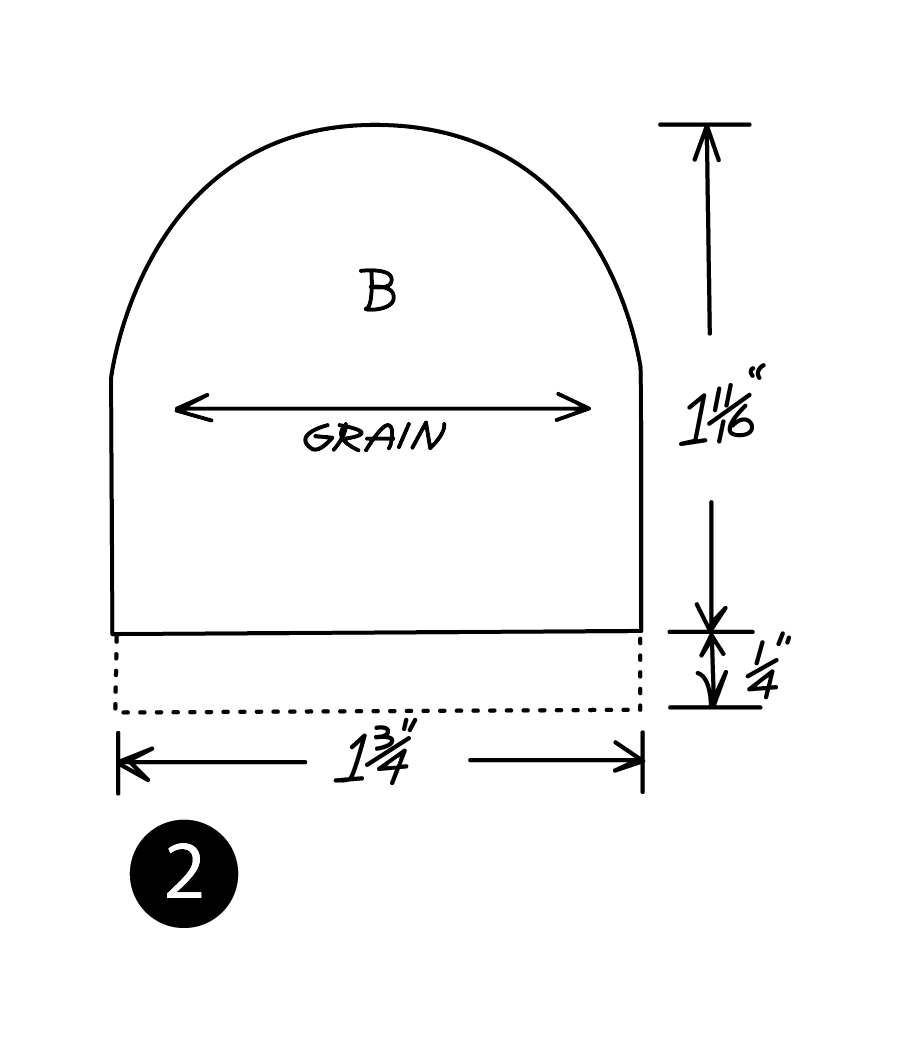
Piece B - Diagram 2
- Cut 2 pieces 1/8” Balsa wood (Solid Outline Only)
- Cut 2 pieces from Cotton padding (solid curved outline plus dotted outline).
- Cut 1 piece from fabric (Solid outline plus dotted Outline).
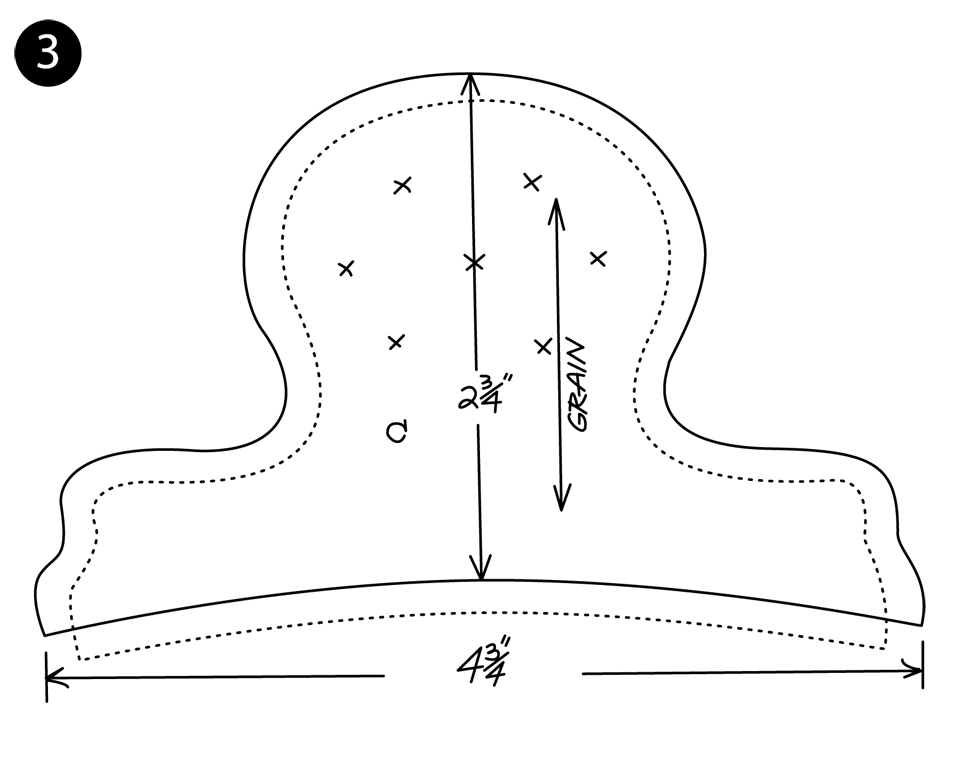
Piece C - Diagram 3
- Cut 1 piece from 1/8” Balsa wood (Solid Outline Only)
- Cut along vertical grain
- Cut 1 piece from Oaktag (shirt) Cardboard
- Cut 1 piece from fabric (Solid outline Only).
- Cut 1 piece from fabric (Dotted outlind Only).
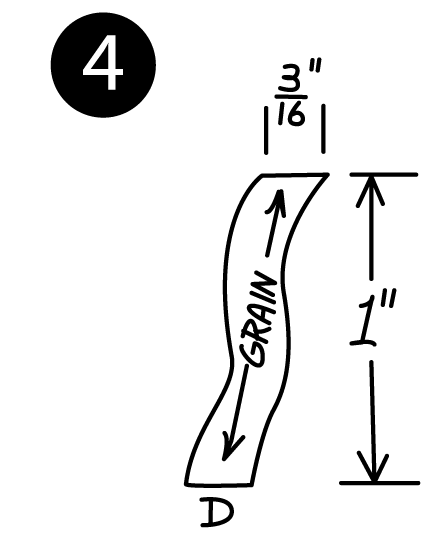
Piece D - Diagram 4
- Cut 2 pieces from 1/8” Balsa wood sheet.
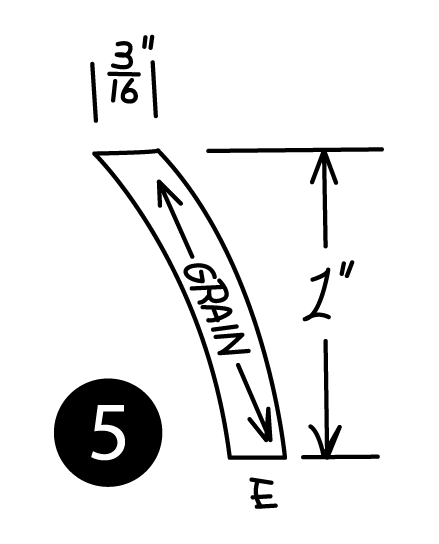
Piece E - Diagram 5
- Cut 2 pieces from 1/8” Balsa wood sheet.
Printable Version
Directions:
Cutting Wood:
- Cut wood on lengthwise grain except for piece (C), which is cut on crosswise grain.
- Base (A) may be made from two pieces of 3/32” balsa sheet glued together to obtain 3/16” thickness.
- The four rectangles on piece (A) are cut out later.
- Glue together two 1/8” pieces (B) to form chair seat ¼” thick; or you may cut one piece for seat (B) out of balsa sheet.
Cutting Oaktag, Cotton Padding, & Fabric:
- Cut 8 pieces, cutting fabric on the crosswise grain.
Sanding & Staining:
- Sand wood.
- Round curved edges of chair back (C) slightly.
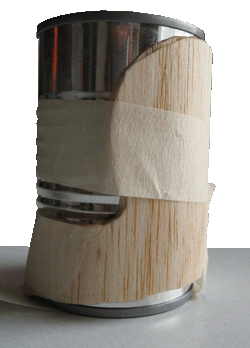
- Soak (C) in warm water for five minutes, then bend carefully around frozen orange juice can with grain running vertically and secure in place with elastic bands or masking tape; don’t let elastic bands indent the soft, wet wood.
- Dry at room temperature or in low oven for ten minutes.
- Stain wood.
Finishing Chair Base
- Carefully cut out four 1/8” x 3/16” rectangles from base (A), as indicated by broken lines in diagram 1.
- Glue legs (D) into cut-outs on straight edge of (A), with top edges of (D) flush with top surface of (A), and the long, 1/8” edges of (D) curving out at top and in near bottom.
- Glue legs (E) into cut-outs on curved edge of (A) in the same manner; the long, 1/8” edges of (E) curve out.
- Shellac assembly from step 1, then smooth legs with steel wool very carefully.
- Varnish assembly from step 1.
Finishing Chair Back
- Shellac all surfaces of chair back (C), then varnish all surfaces of chair back (C).
- Cut three corners of the embossed paper picture frame so they fit together nicely around top curved edge of chair back (C), and trim if necessary.
- Place one embossed paper corner at top of curved edge and two corners on each side of curved edge; glue in place, using a few straight pins to hold paper until glue begins to set. Paint embossed paper with wood tone paint to match stain.
- Glue fabric (C) that was cut from dotted line pattern as follows: Put small amount of glue along curved edge of fabric (not sloping bottom edge) and glue to outside of chair back (C), beginning 3/16” down from top curved edge; smooth out fabric over curved arms as much as possible with out breaking arms.
- Put glue along molded bottom edge of chair back (C) and turn 3/16” of fabric (C) under bottom edge of chair back and glue; be sure fabric is smooth and taut.
- Dye soutache braid to match fabric. Glue braid to raw edges of fabric from step 4, following contour of curved edge; turn braid ends under bottom edge of chair back and glue.
Finishing Chair
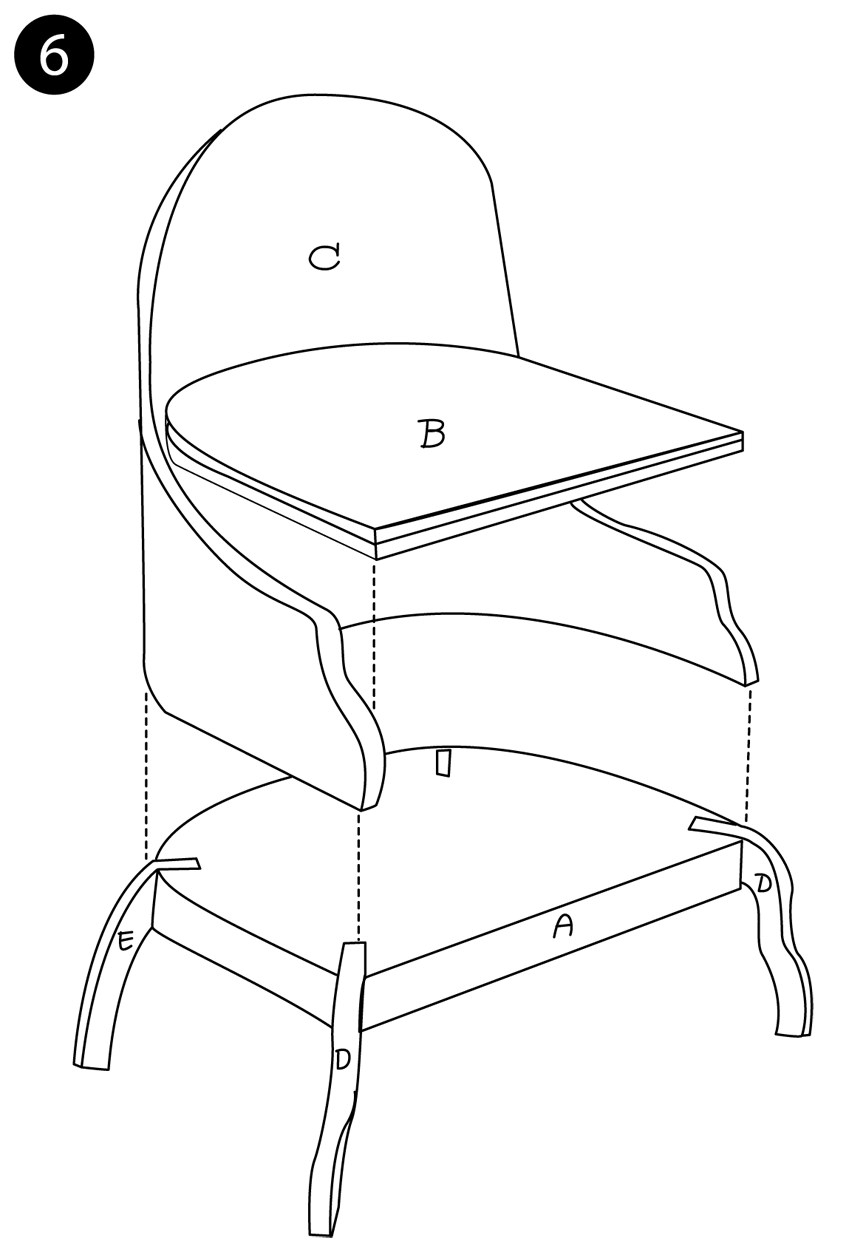
- Glue chair base assembly to chair back assembly: Bottom edge of (C) is glued to curved edge of (A), and outside surface of (C) is flush with curved edge of (A). This may require some refitting and re-gluing.
- For carving on base (A) glue 2” piece of embossed paper picture frame to straight edge of (A) between legs (D); paint embossed paper with wood tone paint to match stain.
- Fit oaktag (C) to inside surface of chair back (C) so a 3/16” curved edge of back (C) shows evenly; you may have to trim oaktakg.
- With oaktag on worksurface, put small amount of glue along sloped bottom edge of oaktag and place two pieces of cotton padding (C) on top. Put small amount of glue along wrong side of sloped bottom edge of fabric (C)—cut from solid line pattern—and put fabric on top of padding right side up. You may have to secure these bottom edges further with needle and thread. Turn assembly over so oaktag is on top.
- Put glue along curved edge of oaktag and glue the 3/16” curved edge of fabric to back of oaktag. To facilitate gluing, make tiny cuttings on edges of seam allowance, especially at narrow curved portions of oaktag. Glue fabric as smoothly and taughtly as possible because when oaktag assembly is put in place, it will be curved.
- Mark fabric (C) with straight pins for placement of French embroidery knots made to resemble the buttons used on heavily tufted furniture. Embroidery floss should match fabric.
- To make one French knot: Knot one end of embroidery floss and stitch from oaktag back to front of fabric, pulling needle and thread completely through; wind floss around tip of needle twice and return needle from fabric front to oaktag back as near as possible to the same hole. Repeat procedure for rest of French knots.
- Glue entire oaktag assembly to inside surface of chair back (C), making sure a 3/16” curved edge of (C) shows evenly at the top of the chair.
- Place both pieces of cotton padding (B) on top surface of chair seat (B) so padding overlaps straight front edge. Place fabric (A) right side up on top of padding so curved edge of fabric overlaps 3/16” along curved edge of padding and straight edge of fabric overlaps ½” along straght edge of seat. Glue fabric to bottom surface of seat ¼” from straight front edge; glue curved edge of fabric to curved edge of seat, making sure fabric is smooth and taut; turn in and fold fabrica t two corners and glue to side edges of seat. Glue seat assembly to top surface of base (A) and to bottom edge of chair back assembly so seat fits snugly.
Variation: OVAL PARLOR CHAIR
A typical Victorian parlor chair may be made with the same directions by eliminating embossed paper carving.


Shrunk Your source of all things miniature
